How to Rewind and Remove Film from the Nishika N8000

This page will cover all of the steps needed to rewind and remove a roll of film from the Nishika N8000. If you need help with loading film into the camera see this step-by-step guide on how to load film into the Nishika N8000.
How to Rewind Film
Time needed: 1 minute.
Here are all the steps you need to follow to successfully rewind the film from your Nishika N8000. For demonstration purposes, I am using a roll of film that has been exposed.
-
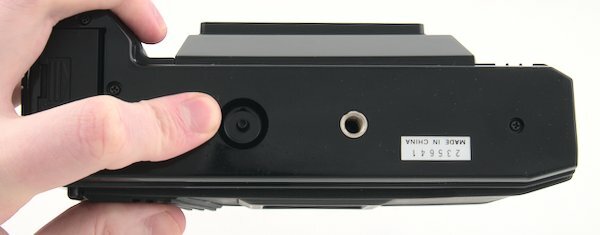
Unlock the Nishika N8000 film take-up spool.
Find and press the small black button on the bottom of the Nishika N8000. It is located in a small indentation in the bottom of the camera. This will unlock the film take-up spool.
-
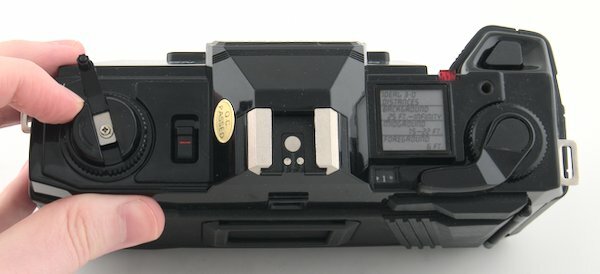
Fold the lever out from the film rewind knob.
Fold the lever out on the film rewind knob. Take note of the direction the arrow points to.
-
Wind the film back into the canister.
Rotate the lever clockwise to wind the film back into the 35mm canister. There will be a small amount of resistance as you wind the film.
When there is less resistance, that’s when you’ll know the film is completely rewound into the canister. You can make a few extra rotations to make sure all the film is in the canister. -
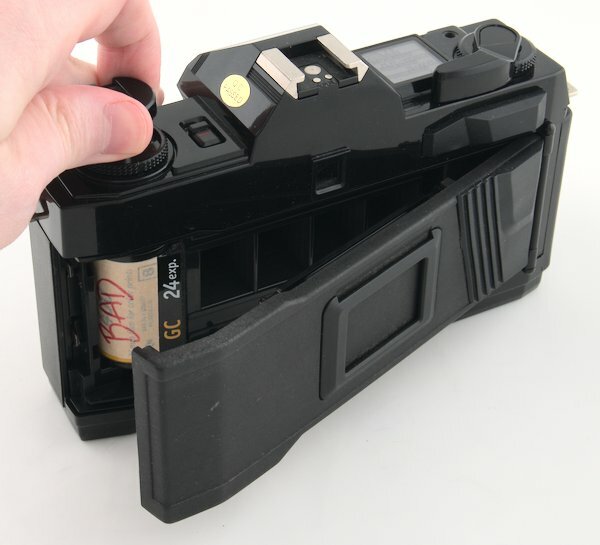
Pull up on the film rewind knob to open the film door.
Pulling up on the film rewind knob will open the film door. Keep the knob raised to allow the canister to be removed.
-
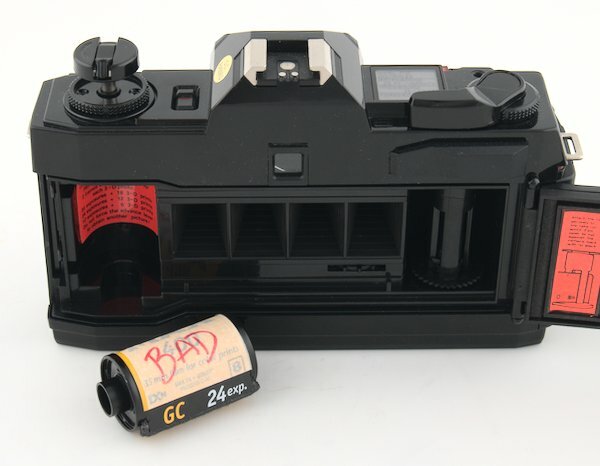
Remove the film canister from the Nishika N8000.
Remove the 35mm film canister from the camera. Keep it away from direct sunlight, heat, and moisture.
-
Load another roll of film.
Now is the best time to load another roll of film into the camera. Here is a step-by-step guide on how to load film into a Nishika N8000.
If you don’t have another roll of film, you can just close the back of the camera. For long-term storage, remove the batteries so they do not leak and cause corrosion in the battery compartment, which can ruin the camera.
Where to get your film developed?
There are 3 different ways you can get your film developed.
Develop the Film Yourself
The least expensive and most involved way to develop your film is to do it yourself at home. This is what I prefer to do.
You will need some inexpensive equipment and a way to scan your negatives or slides.
Developing film yourself is definitely worthwhile as long as you are consistently shooting film. If you are only going to occasionally shoot film, mailing it to a lab is going to be less expensive.
Mail Your Film to a Professional Lab
There are many photo labs that offer mail in developing and scanning services. What’s nice is that you’ll get your film scanned using a high-end scanner. This is a big time saver.
Another important aspect is that you’ll get your negatives or slides back from the lab. This will allow you to make prints in a darkroom or re-scan them in the future. Plus they act as a physical back-up.
Depending on the lab you choose, you can have the ability to select the machine that does the scanning and any profiles/corrections that get used.
You can also indicate if film has been pushed or pulled so that it can be processed correctly.
Here is a list of US photo labs that offer mail developing services. I have no affiliation with them and I have not used any of their services.
- The Darkroom
- Photo Place Inc.
- Indie Film Lab
- Richard Photo Lab
- North Coast Photo
- Old School Photo Lab
- Photoworks San Francisco
- New Jersey Film Lab
- Process One
Find a Local Lab
A local lab is a good option as long as it is an independent professional photo lab. These are likely going to be limited to large cities.
The labs located in pharmacies or big box stores are the worst option as they no longer develop the film on location.
What happens is that the pharmacy or big box store will mail the film off to get developed by a third party. You will only receive digital copies of your images. You will not get your negatives or slides back.